
microsoft, rds, Windows Server
How to modify RDS Idle Timeout and Keep alive time so users don’t get disconnected.
Logon to the RDS server in question.
Open local group policy
Win Key + R > gpedit.msc
Browse to Computer Config > Administrative Templates > Windows Components > Remote Desktop Services > Remote Desktop Session Host > Connections (enable keep alive)
Select Enabled for ‘Configure keep-alive connection interval’

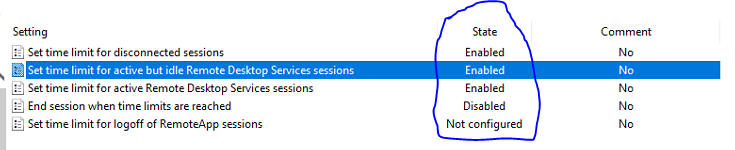
Then browse to Computer Config > Admin Templates > Windows Components > Remote Desktop Services > Remote Desktop Session Host > Session Time Limits.
Select the option shown below and enter a time limit that you see fit.

Repeat the same for the User Configuration
Browse to User Configuration\Policies\Administrative Templates\Windows Components\Remote Desktop Services\Remote Desktop Session Host\Session Time Limits
Select the option shown below and enter a time limit that you see fit.
Apply gpupdate /force via Powershell or Command Prompt on the RDS Server

microsoft, rds, Windows Server
In Windows Server 2019 RDS (Not specific to RDS) users default printer may reset from the default printer they previously set each time the server is rebooted.
You will need to edit the local GPO to stop Windows from managing default printers
On the RDS Server open Local GPO Editor
Windows Key + R
gpedit.msc
Browse to User Configuration > Administrative Templates > Control Panel > Printers
Set the setting ‘Turn off Windows default printer management’ to Enabled.
Perform reboot or gpupdate /force of the RDS Server.

If the above group policy does not work it may be due to the way end users connect via their RDP shortcut, If printer redirection is turned on that default printer on their local machine will be selected rather than the default printer for their RDS user profile.
To fix this apply the below group policy setting on the RDS server.
On the Server go into the Local Group Policy Editor:
Windows Key + R
gpedit.msc

In the Local Group Policy Editor navigate to Computer Configuration > Administrative Templates > Windows Components > Remote Desktop Services > Remote Desktop Session Host > Printer Redirection.

Enable the Do not allow client printer redirection rule to prevent the server to install “Redirected” printers.

Perform a gpudate /force on the RDS Server or perform a reboot of the RDS Server for the GP setting to be applied.

azure, o365
You may want to stop end users from Accessing the Azure AD portal, as they can all view all user accounts and the email addresses associated with user accounts.
Follow the steps below to block user from Accessing Azure AD.
Login to Azure as global admin
Go the Azure AD > User Settings
Also select ‘No‘ for ‘Users can register applications’
Select ‘Yes‘ to ‘Restrict access to Azure AD administration portal’
Optional – Select ‘No‘ for ‘LinkedIn account connections’

End users will now be unable to view other users email addresses and names in Azure AD.