
microsoft, networking, windows 10, windows 11
Bypass Windows 11 Network Setup to create a local user account.
Whether you are turning on your new device for the first time or performed a clean installation of Windows 11, say are always prompted to join a WiFi Network if you are not using an Ethernet cable to connect to the internet, follow the steps below to bypass this network setup so you can create a local account without needing a Microsoft account.
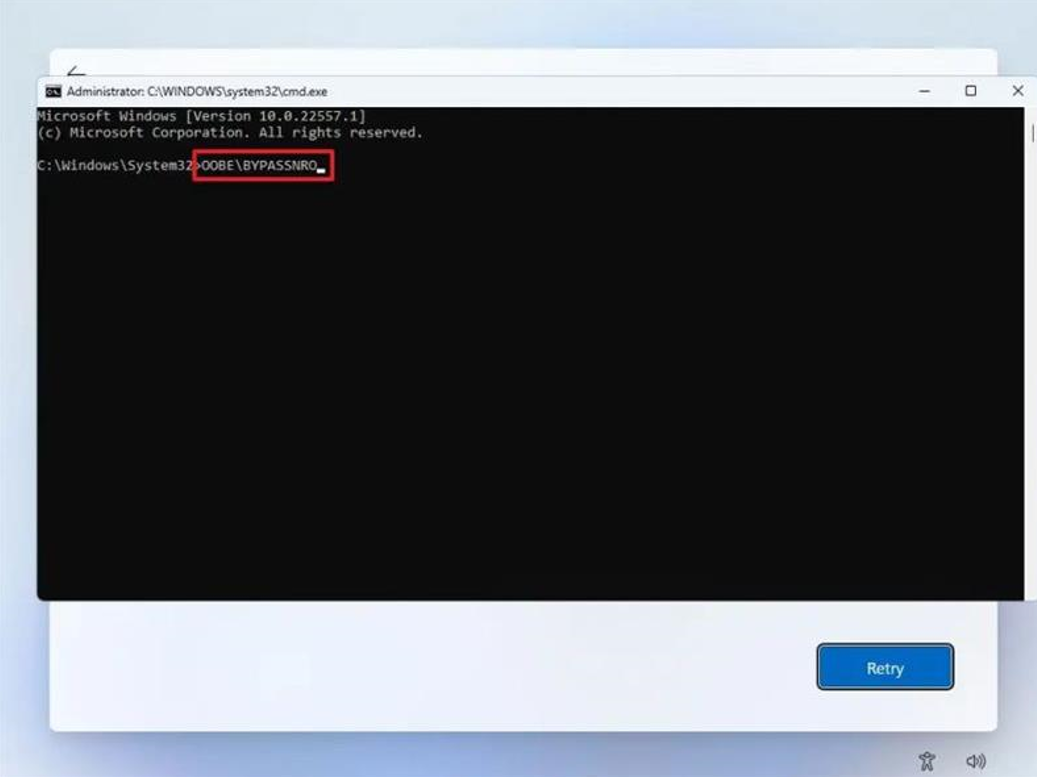
On the “Let’s connect you to a network” page, use the Shift + F10 keyboard shortcut.
In Command Prompt, type the OOBE\BYPASSNRO command to bypass network requirements on Windows 11 and press Enter.
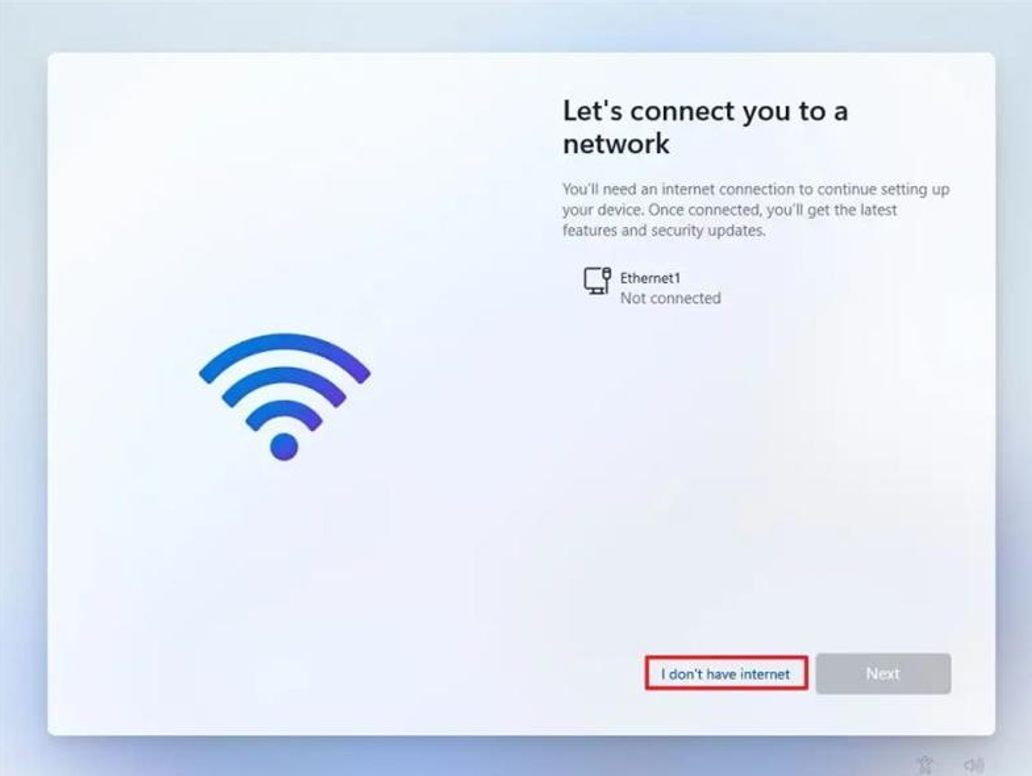
The computer will restart automatically, and the out-of-box experience (OOBE) will start again.
Quick note: You will need to select the region and keyboard settings one more time to get to the network connection page.
Click the “I don’t have internet” option.
Click the “Continue with limited setup” option.
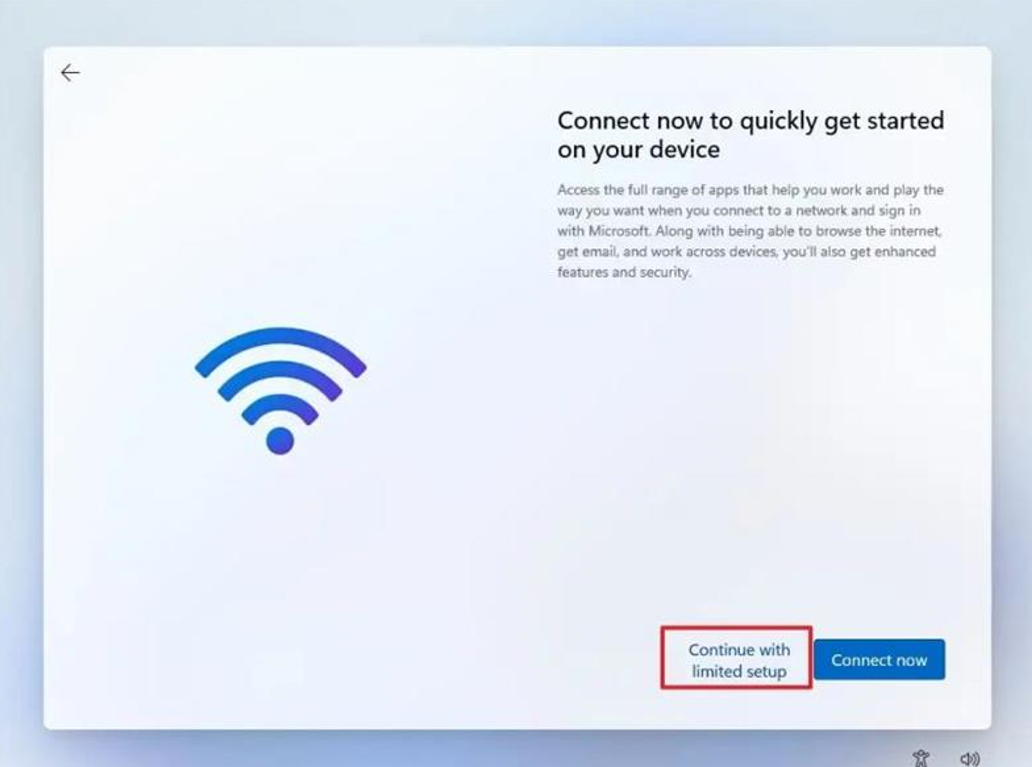
You have now bypassed the Windows 11 Network Setup menu and create a local user account.

active directory, Exchange, microsoft, Windows Server
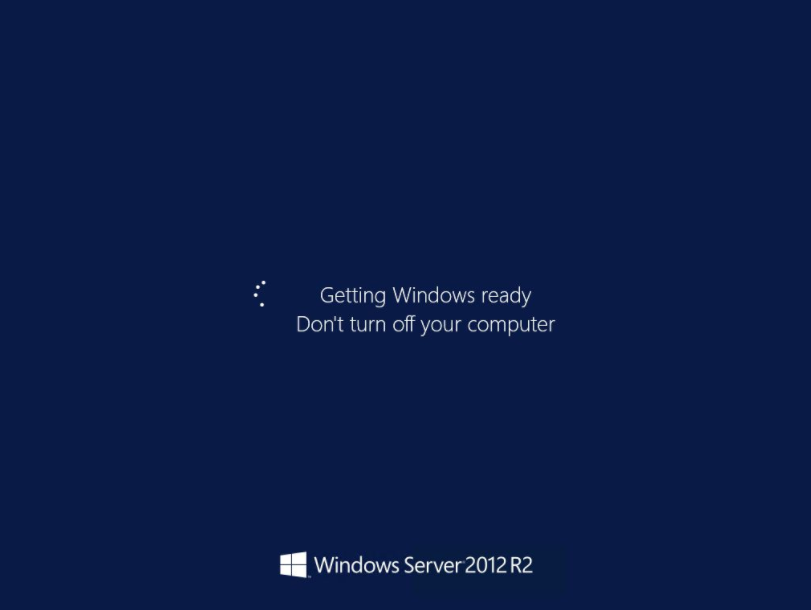
Sometimes when performing exchange server updates after rebooting the server it will hang on ‘Getting Windows Ready’ then sometimes when logging in it may lock up again and become unresponsive.
This is a common issue with Exchange 2013 and Windows Server 2012 R2 Operating System.
Follow the guide below to resolve this issue.
I restarted VM few times, but the Exchange Server VM was unusable.
The best solution is to enter Boot Menu and run VM in Safe Mode.
For this we have to boot VM from Windows Server 2012 R2 ISO and instead of Install option, we select Repair your computer.
After selecting Troubleshoot, we enter Command Prompt.
We enable Boot Menu on our Windows Server 2012 R2 OS of Exchange Server VM by entering commands:
bcdedit /set {bootmgr} displaybootmenu yes
bcdedit /set {bootmgr} timeout 15
After VM reboot, we can enter Boot Menu by pressing F8 and select Safe Mode option.

In Safe Mode Exchange Server VM starts without problems.
Go into Services and disable all Exchange Services on VM (by changing Start-up Type of services to Manual). After this reboot the VM in normal way and machine will start.
Re-enable Exchange Services again (by changing Start-up Type of services to Automatic) and reboot VM.
The Exchange Server should now boot up straight away without being stuck at the ‘Getting Windows Ready’ screen
active directory, hyper-v, microsoft, networking, rds, rwa, Windows Server, windows update
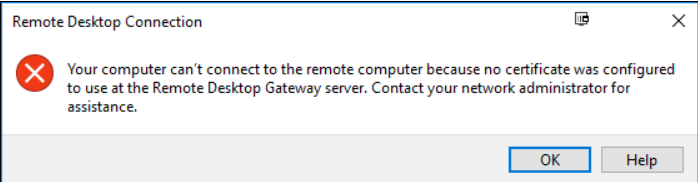
Remote Web Access (RWA) SSL Gateway not working after Windows Update
After installing Windows updates you may get the following error when trying to logon to RDS via RWA (Remote Web Access)
Log into the Domain Controller
Open Powershell as ADMIN
Run the following command:
dism /online /Enable-Feature:Gateway-U

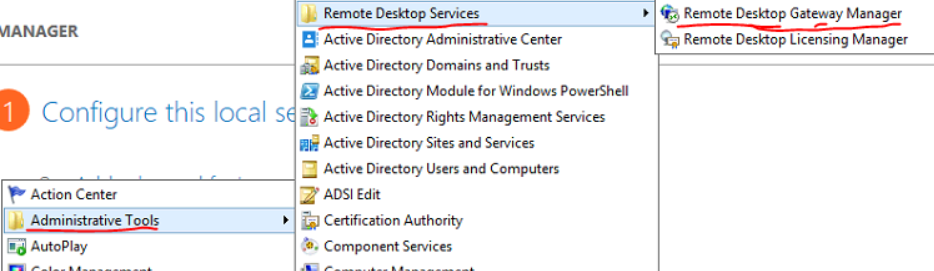
Open the Remote Desktop Gateway Manager from Administrative Tools > Remote Desktop Services.
Right click the server name then select Properties
Select the SSL Certificate tab then select Import Certificate…
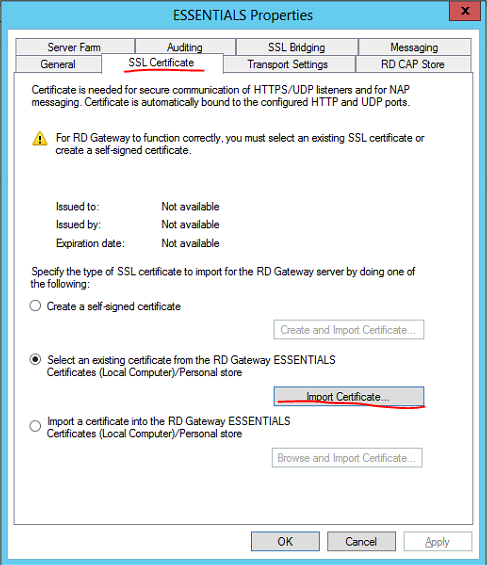
Select the correct SSL certificate for the Remote Desktop Gateway then select Import
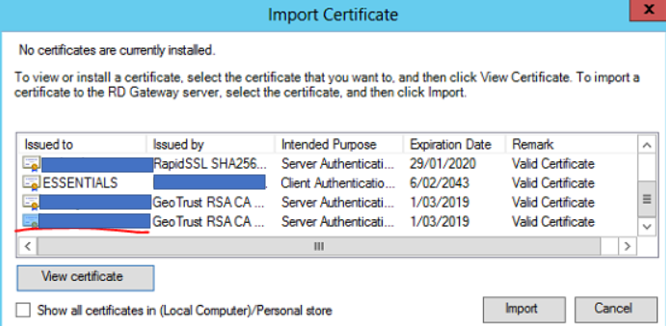
Click Apply then OK
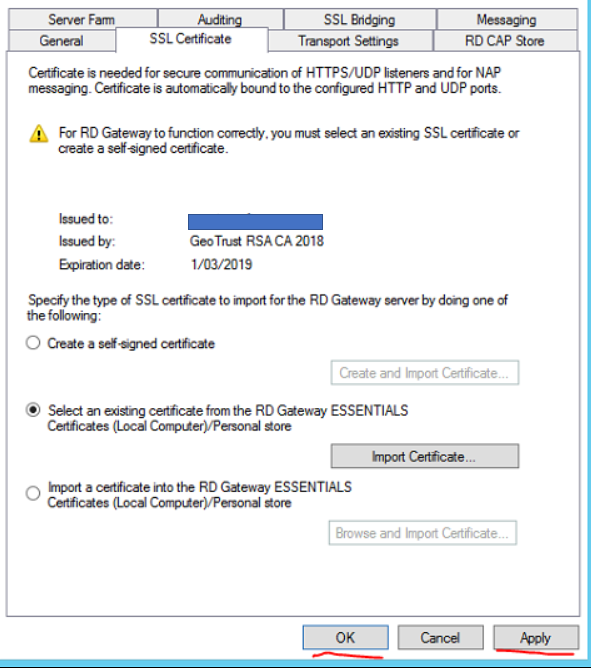
Close Remote Desktop Gateway Manager
Test connectivity via RWA

microsoft, networking, rds, teams, windows 10, Windows Server
Launch powershell as Admin on the workstation server where Microsoft Teams runs at start-up
Execute the following command:
Remove-ItemProperty -Path HKCU:\Software\Microsoft\Windows\CurrentVersion\Run -Name “com.squirrel.Teams.Teams”
Reboot server/workstation
If the above does not work login as an administrator and manually remove MS Teams from Add Programs and Features menu
Exchange, networking, Windows Server
Firstly check to see if IIS is running via services.msc
If you attempt to start the IIS service and it fails you may get the following error message in Event Viewer
The Windows Process Activation Service encountered an error trying to read configuration data from file’\\?\Windows\system32\inetsrv\config\applicationHost.config, line number

If so, navigate to C:\inetpub\history than the latest subfolder and copy the applicationHost.config and copy it to C:\Windows\system32\inetsrv\config\ then restart the World Wide Web Publishing Server and the related others, or reboot the server.

Exchange, networking, Windows Server, windows update
Post Windows Updates you may notice MS Exchange services and other dependent services are disabled you can check this by viewing services.msc
Execute the powershell commands below on the Exchange Server to get the services up and running.
First, we have to know which services there are and which need to have their startup type changed. I used the Get-Service cmdlet to find out. In my case, I was just interested in the Exchange Services, so I needed to filter them with the following command:
Get-Service | Where-Object { $_.DisplayName –like “Microsoft Exchange *”} | ft Name,Status
The output told me which services needed to have their startup type changed. To do that, I only had to change the entry after the last Pipe. (To change the startup type I don’t need a displayed output, but I need to change the startup type for the selected services.) This I did with the following cmdlet:
Get-Service | Where-Object { $_.DisplayName –like “Microsoft Exchange *” } | Set-Service –StartupType Automatic
The Exchange Services startup type was changed from disabled to automatic. But they were still not running. To start the services, we can use the following cmdlet:
Get-Service | Where-Object { $_.DisplayName –like “Microsoft Exchange *” } | Start-Service
Next step, IIS
After the Exchange Services have all changed their startup type and status, we are almost done. There is another service we also have to think about – IIS.
To edit the IIS Admin Service, we can follow the same concept as we did with the Exchange Services. First, we need to identify the services and set the startup type to automatic. For that, we can use this cmdlet:
Get-Service | Where-Object { $_.DisplayName –eq “IIS Admin Service” } | Set-Service –StartupType Automatic
Last but not least, we also need to start IIS Admin Service. This we can do with the following cmdlet:
Get-Service | Where-Object { $_.DisplayName –eq “IIS Admin Service” } | Start-Service
windows 10
How to access Windows 10 start up location to make program run at startup or remove programs that run at startup
The All Users Startup Folder is located at the following path:
C:\ProgramData\Microsoft\Windows\Start Menu\Programs\StartUp
The Current User Startup Folder is located here:
C:\Users\[Username]\AppData\Roaming\Microsoft\Windows\Start Menu\Programs\Startup
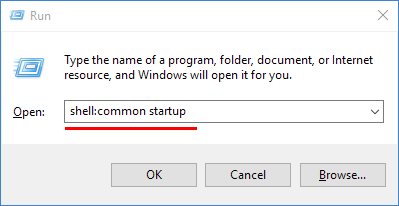
To find the Startup folder, the quickest way is to do the following:
- Hold down the Windows key, and type R
- Type: shell:startup
- Click OK
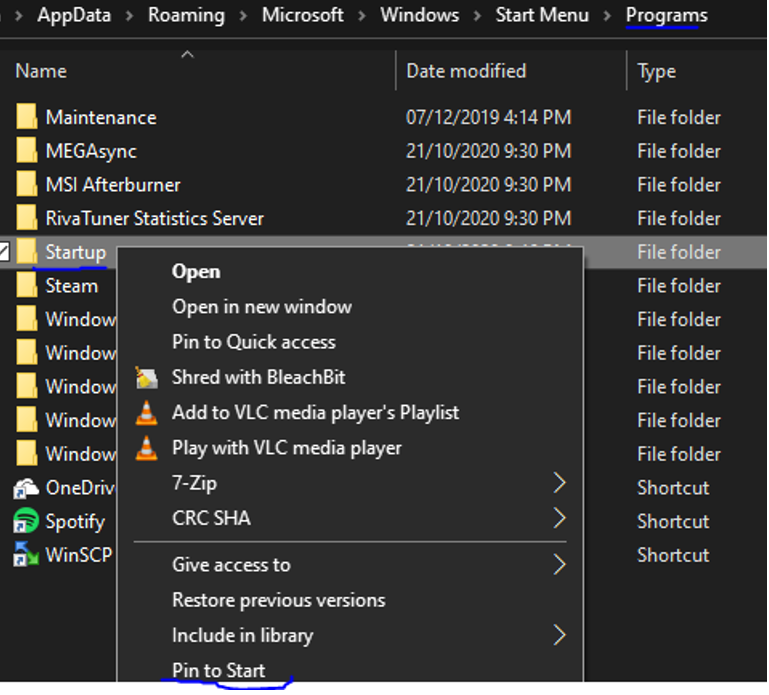
There is an easy way to “bookmark” this folder.
First you need to go up one folder level. You can do this either by clicking on “Programs” in the address bar, or by clicking the up arrow to the left of the address bar.
Then, right-click the Startup folder, and choose Pin to Start:
Note also that there is actually a second Startup folder. The Startup folder above is for your user account only.
The second Startup folder is for programs that run at startup for all users on the computer. To find that Startup folder, we have to modify our Win-R trick slightly:
If the program you’re seeing at startup isn’t in either of the Startup folders, try uninstalling the program itself. Many programs run when Windows starts, but they are launched via other more complicated methods.