
active directory, hyper-v, microsoft, networking, rds, rwa, Windows Server, windows update
Remote Web Access (RWA) SSL Gateway not working after Windows Update
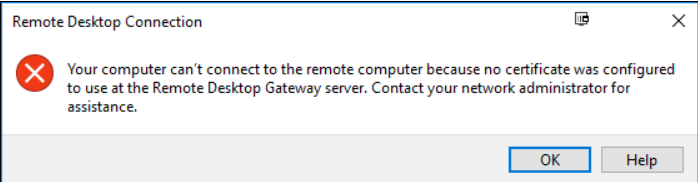
After installing Windows updates you may get the following error when trying to logon to RDS via RWA (Remote Web Access)
Log into the Domain Controller
Open Powershell as ADMIN
Run the following command:
dism /online /Enable-Feature:Gateway-U

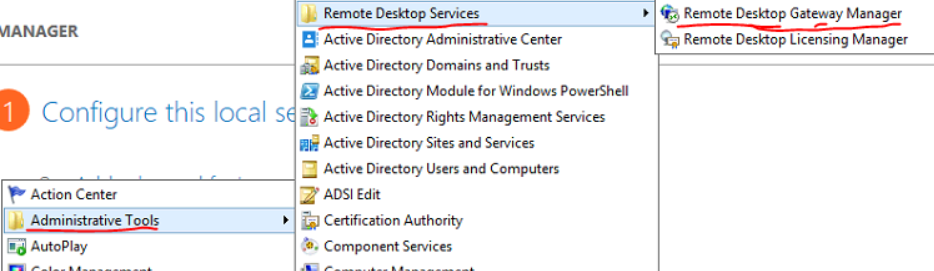
Open the Remote Desktop Gateway Manager from Administrative Tools > Remote Desktop Services.
Right click the server name then select Properties
Select the SSL Certificate tab then select Import Certificate…
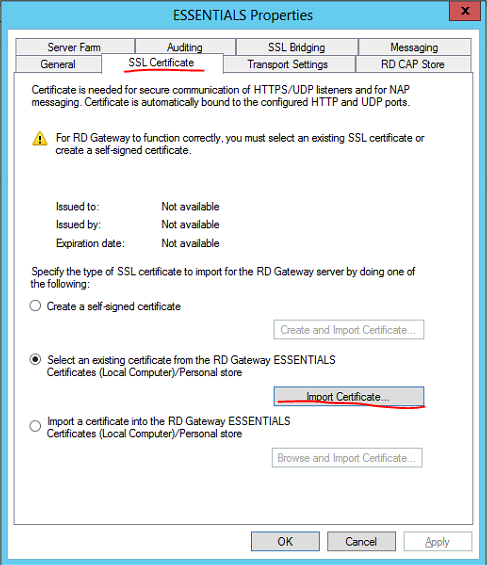
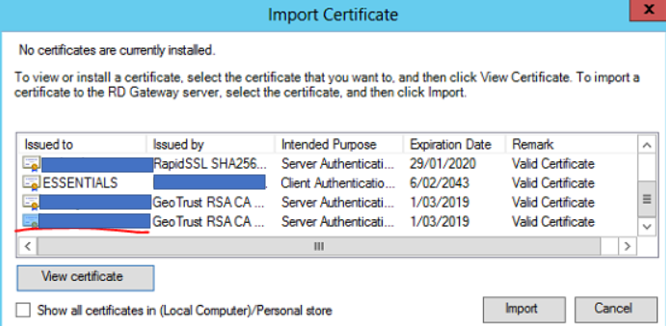
Select the correct SSL certificate for the Remote Desktop Gateway then select Import
Click Apply then OK
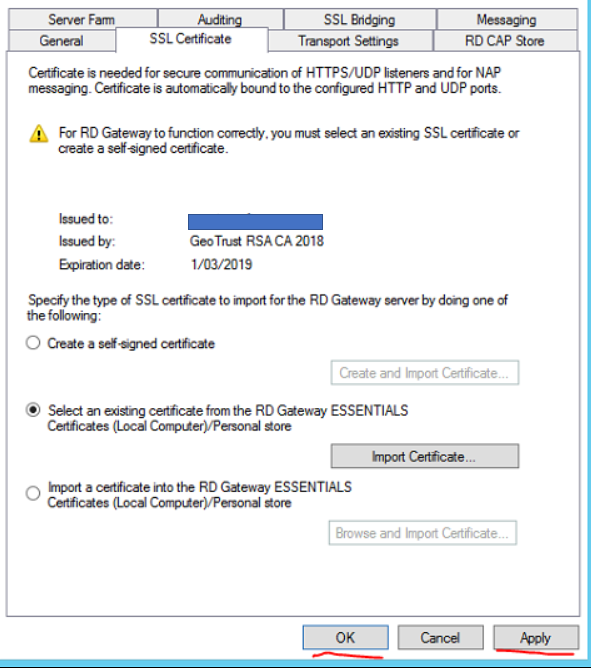
Close Remote Desktop Gateway Manager
Test connectivity via RWA

active directory, microsoft, networking, Windows Server
NOTE: Take a backup and/or snapshot of the VM before making any changes.
When setting up Active Directory, the IT Administrator is given an option to select the folder path to copy the Active Directory database files to. It is advised to always to use a separate partition to save the database files instead of using the default C:\Windows\NTDS\ folder path. This provides an easier opportunity to move the Active Directory database to different location should disk space on the server dry up.
In this Step-By-Step, the lab DC currently stores its AD database files in default C:\Windows\NTDS\ folder. Steps will be detailed amidst this post to move it to a new disk added to the server. The new path it will be moved to will be E:\ADDB
Step 1: Prepping Active Directory to be moved
- Log in to the primary domain controller as domain or enterprise administrator
- In Server Manager, navigate to Tools > Services

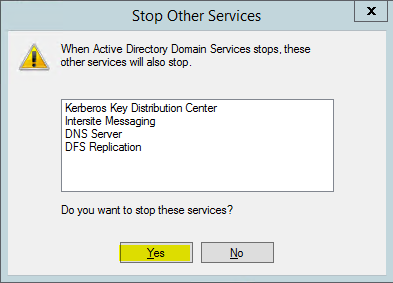
- Once mmc loads, right click on Active Directory Domain Services and click stop

4. When asked if it’s okay to stop associated services, click Yes to continue.
Step 2: Moving the Active Directory database
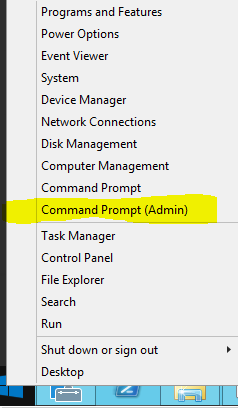
- Right click on start button and click on Command Prompt (Admin)
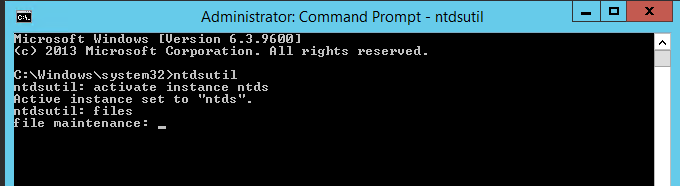
2. Once command prompt is visible, type ntdsutil and press enter

3. Next type activate instance ntds and press enter
4. Then type files and press enter
5. In files maintenance the command to move the db is required. As mentioned earlier, the need to move the database to E:\ADDB.Type the following command to enable the move: move db to E:\ADDB
Note: Remember to use quotations (“”) should the path contain a space

6. Once the database files are successfully moved, type the following command to move the logs: move logs to E:\ADDB
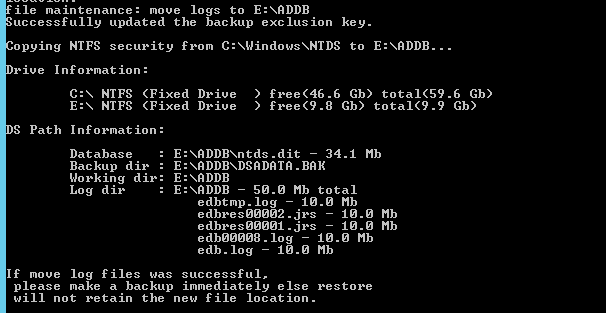
7. Once the move has successfully completed, Return to the initially used services.msc and start Active Directory Domain Services stopped in Step 1
Browse to the new directory where the database files were transferred to confirm they have been transferred successfully.

Restart System.
Test logging in as a AD user.

Exchange, networking, Windows Server, windows update
Post Windows Updates you may notice MS Exchange services and other dependent services are disabled you can check this by viewing services.msc
Execute the powershell commands below on the Exchange Server to get the services up and running.
First, we have to know which services there are and which need to have their startup type changed. I used the Get-Service cmdlet to find out. In my case, I was just interested in the Exchange Services, so I needed to filter them with the following command:
Get-Service | Where-Object { $_.DisplayName –like “Microsoft Exchange *”} | ft Name,Status
The output told me which services needed to have their startup type changed. To do that, I only had to change the entry after the last Pipe. (To change the startup type I don’t need a displayed output, but I need to change the startup type for the selected services.) This I did with the following cmdlet:
Get-Service | Where-Object { $_.DisplayName –like “Microsoft Exchange *” } | Set-Service –StartupType Automatic
The Exchange Services startup type was changed from disabled to automatic. But they were still not running. To start the services, we can use the following cmdlet:
Get-Service | Where-Object { $_.DisplayName –like “Microsoft Exchange *” } | Start-Service
Next step, IIS
After the Exchange Services have all changed their startup type and status, we are almost done. There is another service we also have to think about – IIS.
To edit the IIS Admin Service, we can follow the same concept as we did with the Exchange Services. First, we need to identify the services and set the startup type to automatic. For that, we can use this cmdlet:
Get-Service | Where-Object { $_.DisplayName –eq “IIS Admin Service” } | Set-Service –StartupType Automatic
Last but not least, we also need to start IIS Admin Service. This we can do with the following cmdlet:
Get-Service | Where-Object { $_.DisplayName –eq “IIS Admin Service” } | Start-Service
networking, windows 10, windows update
ISSUE:
I have a client where the Windows 10 update was installed overnight and it has broken the ability for one of the pc’s to access the other pc for file shares. It is a small network (only 2 pc’s) both running W10 Pro. The main pc can see the shares on the other pc but the one I want to see the main pc shares can only see the main pc in networks but not see any shares.
RESOLUTION:
On the sharing pc, after many attempts in getting it going, I did this and it worked:
- Control Panel > System and Security > Administrative Tools > Local Security Policy > expand Local Policies > Security options
- Click on Network security: Lan Manager Authentication level > Then in the field select > Send NTLMv2 responses only > click on Apply, then ok and close all
- Restart your pc.
NOTE:
Windows 10 version 1709 disables SMB 1.0