
active directory, auditing, compliance, microsoft, networking, shared folder, windows 10, Windows Server
Audit all access to folders and/or files on a server or workstation.
Log onto the server/workstation that you wish to enable auditing on.
Open Local Group Policy Editor.
CTRL + R
gpedit.msc

Browse to the following location: – Computer Configuration > Windows Settings > Security Settings > Local Policies > Audit Policy
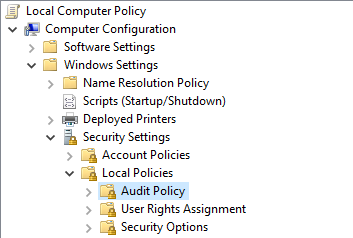
Double click ‘Audit object access’

Select Success and Failure
Click Apply then OK

Exit Local Group Policy Editor
Navigate to the folder/file you wish to track permission changes.
Right click the folder/file then select Properties.
Select the Security tab then select Advanced

Select the Auditing tab then select Continue (if prompted)

Click Add

Click Select a principal

Type ‘everyone’ then select Check Names. – Click OK

Set the Type: to All
Untick the default auditing permissions and only select ‘Change permissions’ – Click OK
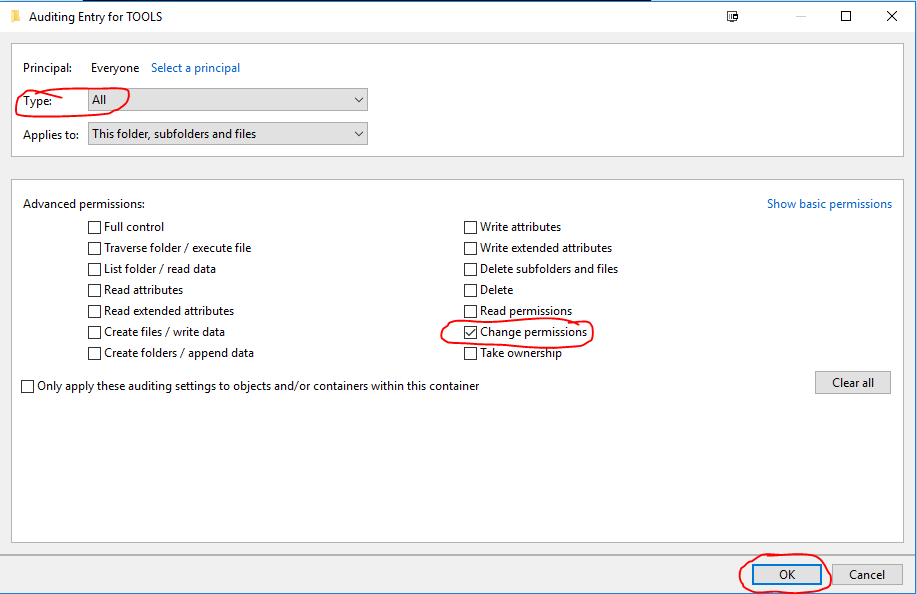
Click OK Twice more.
Open up cmd or powershell as ADMIN
Execute the command: gpupdate /force
Auditing is now implemented on the specific folders/files.
To check audit logs open Event Viewer.
Select the Security Logs
Filter the logs based on Event ID 4670

active directory, licensing, microsoft, rds, rwa, Windows Server
You may want to move the existing RDS licenses to a new server to put an old operating system out of production or just upgrade in general.
Login to the server as an administrator
Install the Remote Desktop Licensing Server and Gateway Role via Server Manager
Once installed open Remote Desktop Licensing Manager from Server Manager

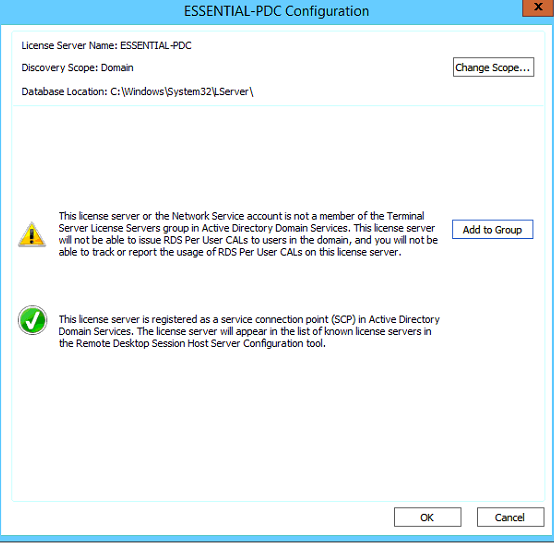
Add the current server into the Terminal Server License Server group as per below,
Select Add to group.


Right click on the server name and select Activate Server

Select Next at the Connect Method screen, (Automatic connection (recommended) is the default)
Enter the relevant information (Company Information) then select Next
Proceed to the next page and fill out additional information.
Click Next and the server will activate
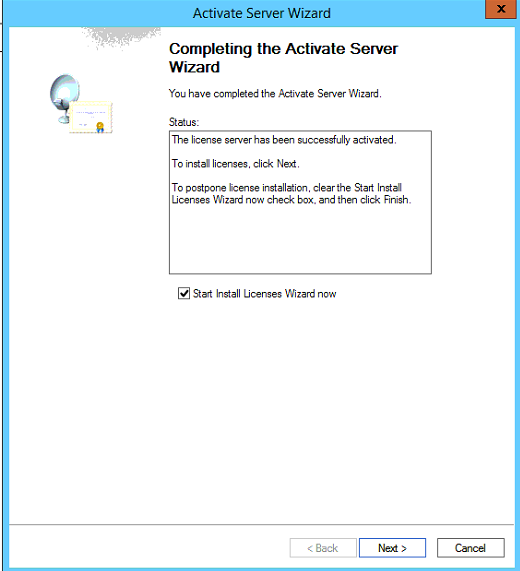
On the new licensing server add the old server into the console by select Action > Connect
Enter the IP Address of the old licensing server.
The old server should now be visible on the new server.
To get the licensing ID right click on the old server and select properties
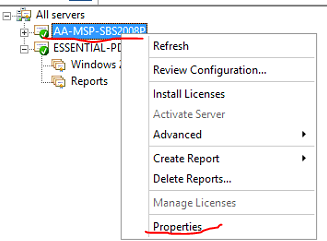
To get the licensing ID right click on the old server and select properties

Select the new licensing server, then go to Action > Manage licenses
Once the window opens select Next
Select the first option as shown below.
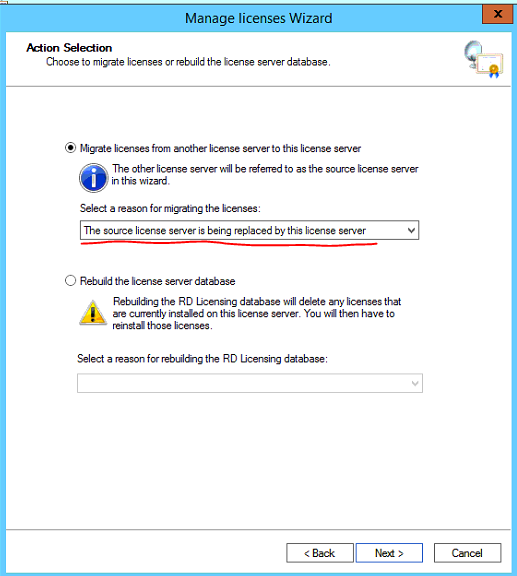
Select the checkbox and select the operation system the old licensing server is running.
Enter the license server ID previously copied, Select Next
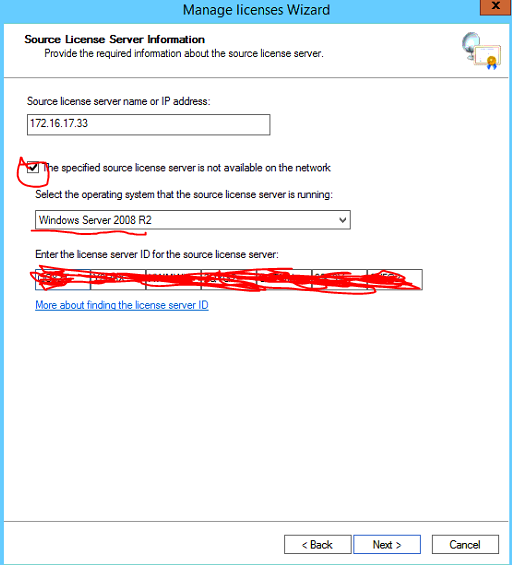
Tick the checkbox to agree to manually remote the licenses from the source server then select next.
If the old licensing Server is running Windows Server 2008 not 2008 R2 you will need the original RDS CAL licenses (Refer to documentation) to apply to the new licensing server as a 2008 server cannot automatically migrate the RDS CAL licenses, only 2008 R2 and above.
If the old licensing Server is running 2008 R2 or above proceed through the wizard to migrate the RDS CAL licenses.
After you have verified the licences are activated and functional you can deactivate the old RDS licensing server.
Once deactivated uninstall the RDS licensing role via Server Manager

Exchange, microsoft, networking, Windows Server
Post Windows Updates you may notice Microsoft Exchange services and other dependent services are disabled you can check this by viewing services.msc
Execute the powershell commands below on the Exchange Server to get the services up and running.
First, we have to know which services there are and which need to have their startup type changed. I used the Get-Service cmdlet to find out. In my case, I was just interested in the Exchange Services, so I needed to filter them with the following command:
Get-Service | Where-Object { $_.DisplayName –like “Microsoft Exchange *”} | ft Name,Status
The output told me which services needed to have their startup type changed. To do that, I only had to change the entry after the last Pipe. (To change the startup type I don’t need a displayed output, but I need to change the startup type for the selected services.) This I did with the following cmdlet:
Get-Service | Where-Object { $_.DisplayName –like “Microsoft Exchange *” } | Set-Service –StartupType Automatic
The Exchange Services startup type was changed from disabled to automatic. But they were still not running. To start the services, we can use the following cmdlet:
Get-Service | Where-Object { $_.DisplayName –like “Microsoft Exchange *” } | Start-Service
Next step, IIS
After the Exchange Services have all changed their startup type and status, we are almost done. There is another service we also have to think about IIS
To edit the IIS Admin Service, we can follow the same concept as we did with the Exchange Services. First, we need to identify the services and set the startup type to automatic. For that, we can use this cmdlet:
Get-Service | Where-Object { $_.DisplayName –eq “IIS Admin Service” } | Set-Service –StartupType Automatic
Last but not least, we also need to start IIS Admin Service. This we can do with the following cmdlet:
Get-Service | Where-Object { $_.DisplayName –eq “IIS Admin Service” } | Start-Service

dell, hardware, java, Windows Server
iDRAC – Unable to launch application error
You may come across an issue when trying to access the iDRAC virtual console.
When attempting to launch iDRAC virtual console you may get the following error.

If you click Details
it may something about a certificate issue.
Click Close, exit out of the iDRAC Java applet

The java.security file will need to be edited to allow SSL certificates lower than 1024 bits encryption.
Navigate to C:\Program Files (x86)\Java\<version>\lib\security\
Right click on the java.security file and Open With Notepad
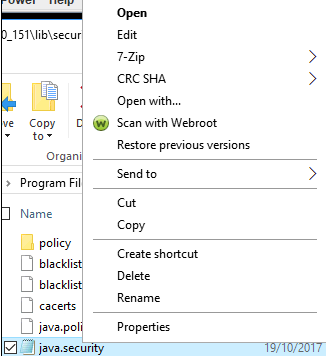
Search for the string (CTRL +F) named
jdk.jar.disabledAlgorithms=MD2, MD5, RSA keySize < 1024
Once found, put a hashtag (#) infront of it to disable this setting

Save the java.security file to the Desktop as it will not let you directly save it to the current file path.
Once saved drag and drop the java.security file from the Desktop into the Java path you were previously in.
C:\Program Files (x86)\Java\<version>\lib\security\
Overwrite the current java.security file
Go back into the iDRAC and download a new Virtual Console Java applet.
You should no longer have the error message that was being displayed.
YOU MAY NEED TO PORT FORWARD PORT 5900 TCP if having ‘Connection has been dropped’ issue

azure, o365
Disable Azure AD registration for devices
Login to M365 portal as a Global Administrator.
Browse to Azure Active Directory > Devices
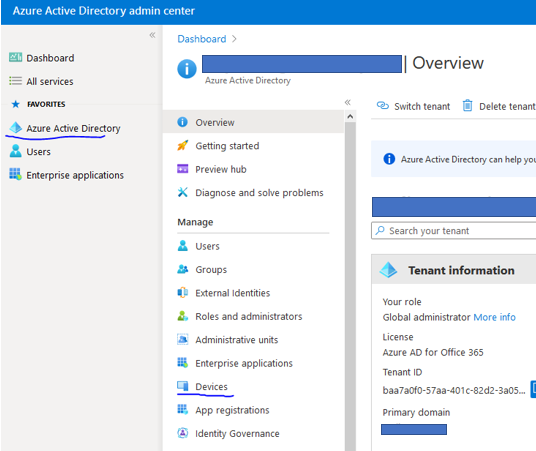
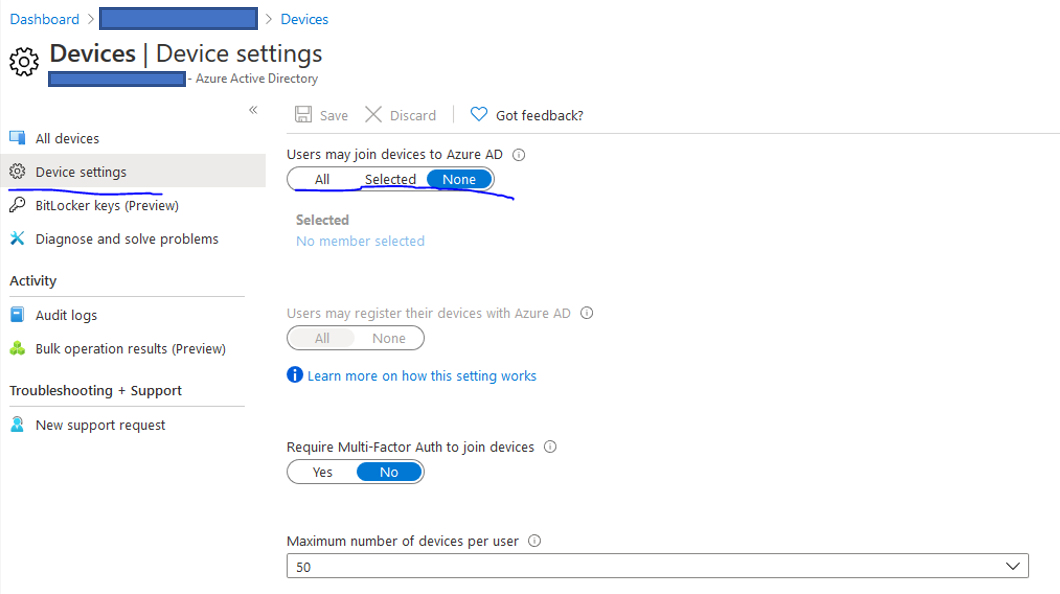
Go into Device settings.
Select None under the ‘Users may join devices to Azure AD‘ option
Check status of machine to see if it is joined to azure AD
Run powershell as Admin
dsregcmd /status
If the device is deleted in Azure AD, you need to re-register the device. To re-register, you must take a manual action on the device.
See below for instructions for re-registration based on the device state.
To re-register hybrid Azure AD joined Windows 10 and Windows Server 2016/2019 devices, take the following steps:
Open the command prompt as an administrator.
Enter dsregcmd.exe /debug /leave
Sign out and sign in to trigger the scheduled task that registers the device again with Azure AD.

microsoft, networking, openssl, ssl, Windows Server
Convert SSL Certificate to .pfx format (Microsoft IIS)
Obtain a SSL Certficate from a trusted CA (Certificate Authority)
Usually you receive three certificates from the CA, SSL Certificate, CA Bundle and a Private key
In this tutorial we will be using the SSL Certificate and Private key.
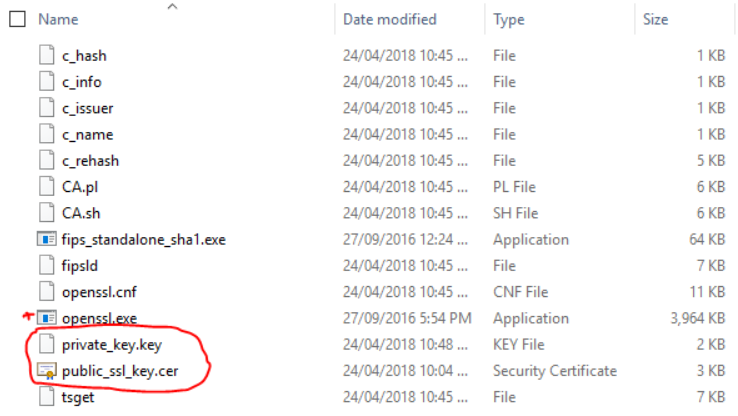
Create a new text document on your local machine called private_key.key paste the contents of the private key from the CA into the file.
Save the file. (Make sure it is saved as .key)
Repeat the same process for the SSL Certificate
Copy the contents of the SSL Certificate key field
Create a new text document on your local machine called public_ssl_key.cer paste the contents of the SSL Certificate into the file.
Save the file. (Make sure it is saved as .cer)
You will end up with the following 2 files

To bind the public/private key pair and a set password for .PFX File you will need to download OpenSSL
Download OpenSSL: https://sourceforge.net/projects/openssl/files/latest/download?source=files
Once downloaded extract the contents of the OpenSSL folder and browse to the bin folder.
Open Powershell as Administrator and change to the directory of the bin folder.
Example: cd C:\openssl-1.0.2j-fips-x86_64\OpenSSL\bin
Copy the previously created SSL files containing the Public and Private key into this directory.
Execute the following command to generate a .PFX file with a password
.\openssl.exe pkcs12 -export -inkey private_key.key -in public_ssl_key.cer -out ssl_cert.pfx
(This will create a .pfx called ssl_cert.pfx and will be saved in same directory as the bin directory.)
You will then be prompted to enter a password for the .PFX file.

The .PFX file will then be generated with a password attached to it.

You can now use this certificate to Import into IIS on Windows Server or via Windows MMC Console.

active directory, hyper-v, microsoft, networking, rds, rwa, Windows Server, windows update
Remote Web Access (RWA) SSL Gateway not working after Windows Update
After installing Windows updates you may get the following error when trying to logon to RDS via RWA (Remote Web Access)

Log into the Domain Controller
Open Powershell as ADMIN
Run the following command:
dism /online /Enable-Feature:Gateway-U

Open the Remote Desktop Gateway Manager from Administrative Tools > Remote Desktop Services.

Right click the server name then select Properties
Select the SSL Certificate tab then select Import Certificate…
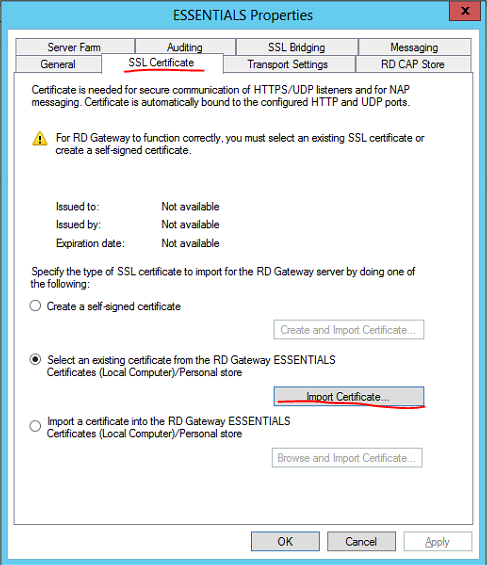
Select the correct SSL certificate for the Remote Desktop Gateway then select Import

Click Apply then OK

Close Remote Desktop Gateway Manager
Test connectivity via RWA

microsoft, networking, rds, teams, windows 10, Windows Server
Launch powershell as Admin on the workstation server where Microsoft Teams runs at start-up
Execute the following command:
Remove-ItemProperty -Path HKCU:\Software\Microsoft\Windows\CurrentVersion\Run -Name “com.squirrel.Teams.Teams”
Reboot server/workstation
If the above does not work login as an administrator and manually remove MS Teams from Add Programs and Features menu

active directory, microsoft, networking, Windows Server
NOTE: Take a backup and/or snapshot of the VM before making any changes.
When setting up Active Directory, the IT Administrator is given an option to select the folder path to copy the Active Directory database files to. It is advised to always to use a separate partition to save the database files instead of using the default C:\Windows\NTDS\ folder path. This provides an easier opportunity to move the Active Directory database to different location should disk space on the server dry up.
In this Step-By-Step, the lab DC currently stores its AD database files in default C:\Windows\NTDS\ folder. Steps will be detailed amidst this post to move it to a new disk added to the server. The new path it will be moved to will be E:\ADDB
Step 1: Prepping Active Directory to be moved
- Log in to the primary domain controller as domain or enterprise administrator
- In Server Manager, navigate to Tools > Services

- Once mmc loads, right click on Active Directory Domain Services and click stop

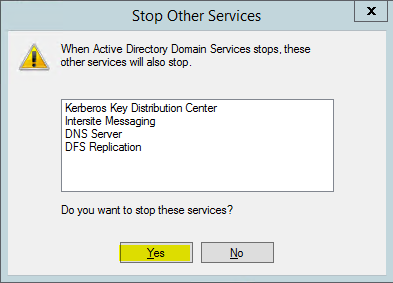
4. When asked if it’s okay to stop associated services, click Yes to continue.
Step 2: Moving the Active Directory database
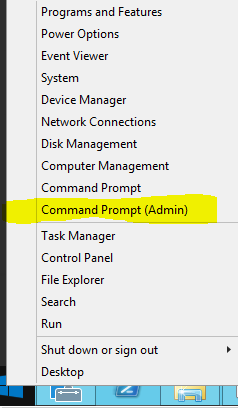
- Right click on start button and click on Command Prompt (Admin)
2. Once command prompt is visible, type ntdsutil and press enter

3. Next type activate instance ntds and press enter
4. Then type files and press enter

5. In files maintenance the command to move the db is required. As mentioned earlier, the need to move the database to E:\ADDB.Type the following command to enable the move: move db to E:\ADDB
Note: Remember to use quotations (“”) should the path contain a space

6. Once the database files are successfully moved, type the following command to move the logs: move logs to E:\ADDB
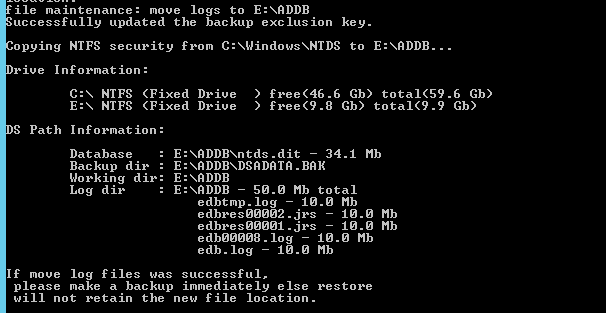
7. Once the move has successfully completed, Return to the initially used services.msc and start Active Directory Domain Services stopped in Step 1
Browse to the new directory where the database files were transferred to confirm they have been transferred successfully.

Restart System.
Test logging in as a AD user.

microsoft, rds, Windows Server
How to modify RDS Idle Timeout and Keep alive time so users don’t get disconnected.
Logon to the RDS server in question.
Open local group policy
Win Key + R > gpedit.msc

Browse to Computer Config > Administrative Templates > Windows Components > Remote Desktop Services > Remote Desktop Session Host > Connections (enable keep alive)
Select Enabled for ‘Configure keep-alive connection interval’

Then browse to Computer Config > Admin Templates > Windows Components > Remote Desktop Services > Remote Desktop Session Host > Session Time Limits.
Select the option shown below and enter a time limit that you see fit.

Repeat the same for the User Configuration
Browse to User Configuration\Policies\Administrative Templates\Windows Components\Remote Desktop Services\Remote Desktop Session Host\Session Time Limits
Select the option shown below and enter a time limit that you see fit.

Apply gpupdate /force via Powershell or Command Prompt on the RDS Server

hyper-v, microsoft, networking, Windows Server
VMQ can cause erratic virtual machine network performance when enabled, such as latency and dropped network connections. This is especially common with Broadcom Gigabit network adapters.
This how-to will show you how to disable VMQ on your Windows host server using PowerShell.
On your host, open up a PowerShell prompt as an Administrator and enter the following command to return all of your installed NIC’s and their VMQ status:
Get-NetAdapterVmq

Next, for any NIC listed in step 1 above with VMQ set to $true, run the below command to disable VMQ. The NIC will become disconnected for approximately one second after you run this command:
Set-NetAdapterVmq -Name “NIC Name” -Enabled $False
Disable RSC with the commands below:
netsh int tcp set global rsc=disabled
Get-NetAdapterRsc | Disable-NetAdapterRsc
Get-VmSwitch | Set-VMSwitch -EnableSoftwareRsc $false

microsoft, rds, Windows Server
In Windows Server 2019 RDS (Not specific to RDS) users default printer may reset from the default printer they previously set each time the server is rebooted.
You will need to edit the local GPO to stop Windows from managing default printers
On the RDS Server open Local GPO Editor
Windows Key + R
gpedit.msc
Browse to User Configuration > Administrative Templates > Control Panel > Printers
Set the setting ‘Turn off Windows default printer management’ to Enabled.
Perform reboot or gpupdate /force of the RDS Server.

If the above group policy does not work it may be due to the way end users connect via their RDP shortcut, If printer redirection is turned on that default printer on their local machine will be selected rather than the default printer for their RDS user profile.
To fix this apply the below group policy setting on the RDS server.
On the Server go into the Local Group Policy Editor:
Windows Key + R
gpedit.msc

In the Local Group Policy Editor navigate to Computer Configuration > Administrative Templates > Windows Components > Remote Desktop Services > Remote Desktop Session Host > Printer Redirection.

Enable the Do not allow client printer redirection rule to prevent the server to install “Redirected” printers.

Perform a gpudate /force on the RDS Server or perform a reboot of the RDS Server for the GP setting to be applied.


